Discover the complete Mount Meru trekking itinerary with day-by-day breakdown, huts, altitude guide, packing tips, safety advice, and expert trekking plan in Tanzania.
Quick Summary
A well-planned Mount Meru trekking itinerary is essential for successfully reaching the summit of Tanzania’s second-highest mountain. Located inside Arusha National Park, Mount Meru offers a structured 3 to 4-day climbing route that includes forest trekking, wildlife encounters, hut accommodation, and a midnight summit attempt. This guide introduces the full itinerary, explains how each day is structured, and helps trekkers understand what to expect at every stage of the Mount Meru trekking itinerary.
| Day | Route Stage | Altitude |
|---|---|---|
| Day 1 | Gate to Miriakamba Hut | ~2,514m |
| Day 2 | Miriakamba to Saddle Hut | ~3,570m |
| Day 3 | Summit + Descent | 4,566m |
| Optional Day 4 | Full descent rest | Lower zones |
Understanding Mount Meru Trekking Itinerary
A proper Mount Meru trekking itinerary is designed to help trekkers acclimatize gradually while experiencing the mountain’s diverse ecosystems. Unlike many hiking routes that allow flexible movement, Mount Meru follows a fixed, structured schedule managed by Arusha National Park authorities.
The Mount Meru trekking itinerary is carefully designed to:
- Reduce altitude sickness risk
- Provide rest at key elevations
- Allow wildlife viewing in lower zones
- Ensure safety through guided trekking
- Optimize summit success rates
Each stage of the Mount Meru trekking itinerary builds on the previous day, making it a progressive and structured adventure.
Why a Structured Itinerary Matters
The importance of a Mount Meru itinerary lies in safety, efficiency, and experience quality. Without a structured plan, trekkers would struggle with altitude, navigation, and timing.
Key benefits include:
- Controlled altitude gain
- Scheduled rest at huts
- Predictable meal planning
- Ranger-guided safety system
- Organized summit timing
This makes the Mount Meru itinerary one of the most beginner-friendly high-altitude trekking systems in Africa.
Overview of the Route System
The official Mount Meru trekking itinerary follows a single main route through Arusha National Park. The journey begins at the Momella Gate and passes through forest, heath, and alpine zones before reaching Socialist Peak.
Key stops include:
- Momella Gate (start point)
- Miriakamba Hut (first overnight stop)
- Saddle Hut (final base before summit)
- Socialist Peak (summit point)
Each stop is an essential part of the Mount Meruitinerary, contributing to acclimatization and safety.
Day 1: Gate to Miriakamba Hut Experience
The first day of the Mount Meru trekking itinerary begins at Momella Gate inside Arusha National Park.
Trekkers walk through:
- Open savannah landscapes
- Forested areas
- Wildlife-rich zones
Common sightings include giraffes, buffaloes, warthogs, and monkeys.
This day is often considered the most scenic part of the Mount Meru itinerary because it feels like a walking safari combined with a mountain hike.
By late afternoon, trekkers reach Miriakamba Hut for rest and overnight stay.
Day 2: Ascending to Saddle Hut
The second stage of the Mount Meru trekking itinerary is more physically demanding. The trail becomes steeper, and vegetation changes from dense forest to heath zone.
Key experiences include:
- Steep uphill climbs
- Cooler temperatures
- Reduced wildlife sightings
- Increasing altitude effects
This section of the Mount Meru itinerary is critical for acclimatization before the summit attempt.
Trekkers arrive at Saddle Hut in the afternoon, where they rest and prepare for the midnight climb.
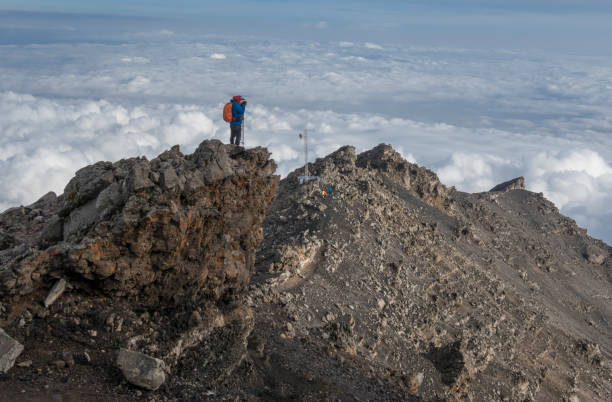
Day 3: Summit Attempt and Descent Begins
The third day is the most intense part of the Mount Meru trekking itinerary.
Climbers wake up around midnight to begin the summit push. The route to Socialist Peak involves:
- Steep volcanic ridges
- Cold wind exposure
- High altitude fatigue
- Slow, guided pacing
Reaching the summit is the highlight of the Mount Meru itinerary, offering sunrise views over Mount Kilimanjaro and the crater below.
After celebration, trekkers descend back to Saddle Hut and continue further down depending on energy levels.
Optional Day 4: Full Descent Recovery
Some versions of the Mount Meru trekking itinerary include a fourth day for relaxed descent and recovery.
This option allows trekkers to:
- Descend at a slower pace
- Recover from summit fatigue
- Enjoy final forest scenery
- Reduce physical strain
This flexible structure makes the Mount Meru trekking itinerary suitable for different fitness levels.
Expert Insight on Itinerary Planning
Experienced guides emphasize that a successful Mount Meru trekking itinerary depends on pacing, hydration, and mental preparation.
Expert recommendations include:
- Follow guide instructions strictly
- Respect altitude progression
- Maintain steady walking speed (“pole pole”)
- Stay hydrated throughout the trek
These principles ensure safety and success during the Mount Meru trekking itinerary.
Packing Strategy, Daily Preparation, and Safety Systems in Mount Meru Trekking Itinerary

A successful Mount Meru itinerary depends not only on following the correct route but also on how well trekkers prepare for each stage of the climb. Since the itinerary includes rapid altitude gain, changing weather conditions, and varied terrain, proper preparation is essential for safety and performance.
Every stage of the Mount Meru itinerary requires different physical, mental, and equipment readiness. Trekkers who plan properly tend to experience smoother ascents, better acclimatization, and higher summit success rates.
Essential Packing Strategy for Mount Meru Trekking Itinerary
One of the most important aspects of the Mount Meru trekking itinerary is having the correct gear. Because the route moves through forest, heath, and alpine zones, trekkers must be prepared for both warm and freezing conditions.
Core Packing Essentials
- Waterproof hiking jacket and trousers
- Warm fleece or thermal layers
- Broken-in hiking boots with strong grip
- Lightweight gloves and warm hat
- Headlamp with extra batteries
- Sleeping bag suitable for cold temperatures
- Daypack for daily essentials
These items are critical for completing the Mount Meru itinerary safely and comfortably.
Clothing Layering System for Each Itinerary Stage
A proper layering system is one of the most effective Mount Meru trekking itinerary preparation strategies.
Base Layer (All Days)
- Moisture-wicking shirts
- Quick-dry underwear
- Lightweight thermal tops
Mid Layer (Cold Sections)
- Fleece jackets
- Insulating pullovers
- Lightweight sweaters
Outer Layer (Rain & Wind Protection)
- Waterproof jacket
- Windproof shell
- Rain trousers
This system allows trekkers to adapt quickly to weather changes during the Mount Meru trekking itinerary.
Day-by-Day Preparation Strategy

Each stage of the Mount Meru trekking itinerary requires different preparation approaches.
Day 1 Preparation
- Light hiking pace
- Energy conservation
- Wildlife awareness
- Hydration focus
Day one is often the easiest part of the Mount Meru trekking itinerary, but proper pacing is still essential.
Day 2 Preparation
- Steeper terrain readiness
- Increased hydration
- Energy-rich meals
- Altitude awareness
This is the most physically demanding part of the Mount Meru trekking itinerary before summit day.
Day 3 Preparation
- Midnight wake-up readiness
- Cold weather protection
- Mental endurance focus
- Slow summit pacing
Summit day is the most critical stage of the Mount Meru trekking itinerary and requires strong mental discipline.
Safety Systems in Mount Meru Trekking Itinerary
Safety is a core part of the Mount Meru trekking itinerary, and all climbs are supported by trained guides and park rangers.
Key Safety Elements
- Mandatory guided trekking
- Ranger escort in wildlife zones
- Hut-based accommodation system
- Controlled ascent routes
- Emergency communication support
These systems ensure that the Mount Meru trekking itinerary remains safe even in challenging conditions.
Altitude Management Across the Itinerary
Altitude is one of the most important factors in the Mount Meru trekking itinerary.
As trekkers move from lower forest zones to high alpine environments, oxygen levels decrease gradually.
Altitude safety practices include:
- Slow walking pace (“pole pole”)
- Regular hydration
- Avoiding overexertion
- Monitoring physical symptoms
Proper altitude management improves success rates in the Mount Meru trekking itinerary.
Comparison Table: 3-Day vs 4-Day Mount Meru Trekking Itinerary
| Feature | 3-Day Itinerary | 4-Day Itinerary |
|---|---|---|
| Pace | Fast | Moderate |
| Fatigue Level | Higher | Lower |
| Acclimatization | Limited | Better |
| Summit Success Rate | Moderate | Higher |
| Recovery Time | Short | Better |
This comparison helps trekkers choose the best Mount Meru trekking itinerary based on fitness and experience.
Common Preparation Mistakes
Many challenges in the Mount Meru trekking itinerary come from avoidable mistakes.
Common errors include:
- Wearing new unbroken boots
- Underestimating cold temperatures
- Ignoring hydration needs
- Carrying unnecessary heavy items
- Walking too fast at high altitude
Avoiding these mistakes improves safety and enjoyment during the Mount Meru trekking itinerary.
Expert Guide Recommendations
Professional guides emphasize that a successful Mount Meru trekking itinerary depends on discipline, preparation, and respect for mountain conditions.
Key expert advice includes:
- Follow itinerary pacing strictly
- Keep gear waterproof at all times
- Trust guide instructions during summit push
- Maintain steady energy intake
- Prioritize safety over speed
These principles significantly improve performance in the Mount Meru trekking itinerary.
External Reference for Trekking Preparation
For additional trekking preparation standards, travelers can refer to general mountaineering safety guidelines provided by international hiking organizations such as UIAA:
